
- Sheep 201 Index
- Other web sites
Body condition scoring
BCS 3
BCS 4-5 (fat)
Temperature is an
imporant
vital sign.
Esophageal feeding tube
Tubing
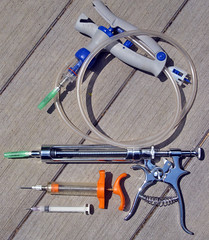
Tools
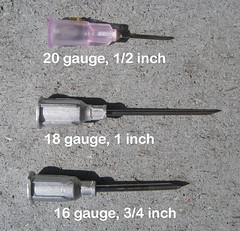
Needles
Ear tags
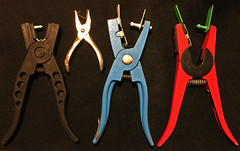
Different ear tag applicators
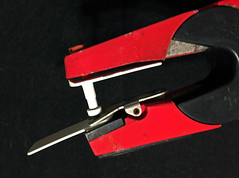
Lining up jaws of tagger
Proper ear tag placement
Don't do this
Drawing blood
Prolapse retainer
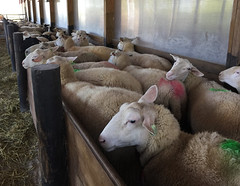
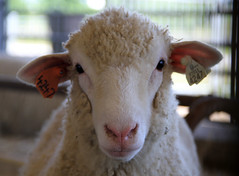
Ready to be handled

Shepherding skills
There are certain basic skills (or husbandry practices) that all shepherds should master. These include body condition scoring, castrating, catching, collecting blood, drenching, docking, FAMACHA© scoring, hoof trimming, injecting, mouthing, replacing a prolapse, tipping, and tubing. Some skills are discussed in other chapters.
Body condition scoring
Body condition scoring is one of the shepherd's most valuable management tools. Body condition scoring has many applications, including assessing the health and nutritional status of a sheep, determining a sheep's readiness for breeding, and assessing market readiness of lambs. It is one of the check points in the Five Point Check®, a chute-side, decision-making tool for making deworming decisions.
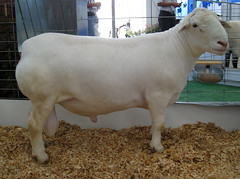
Sheep are usually body condition scored using a scale of 1 to 5, including using half scores. A score of 1 is indicative of a very thin, emaciated sheep, whereas a 5 is a very fat, obese animal. Most sheep fluctuate between 2 and 4, depending upon their stage of production. Diet also has a big influence on body condition score. For obvious reasons, fed-sheep tend to have higher body condition scores than pastured animals. Animals that are at the extreme ends of the body condition scale are considered undesirable.
Description of body condition scores
It is difficult to determine the body condition score of most sheep simply by looking at them. Wool or hair coats, even pregnancy, can mask body condition. You need to get your hands on the sheep. Body condition score (BCS) is determined by feeling for fat and muscle over the sheep's backbone, ribs, and loin. You do this by placing your thumb on the sheep's backbone and moving your spread fingers across the sheep's ribs. Do the same across the loin.
The backbone, ribs, and spinous processes (of the loin) will feel more prominent (pointy) the thinner the sheep is. They will be more difficult to detect as the sheep increases in body condition score. In fact, it is hard to detect the bones in an obese (BCS 5) sheep. Different standards need to be applied to different kinds of sheep, as they fatten differently. Because hair sheep and Finnsheep fatten similarly as goats -- from the inside out -- you don't want them to handle with as much external fat as wooled sheep. If a hair sheep (and Finnsheep) and wooled sheep have the same amount of external fat, the hair sheep will be considerably fatter, due to their higher amount of internal fat.
Catching
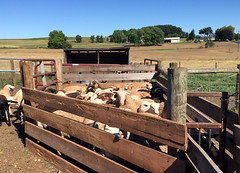
Sometimes, it is necessary to catch an individual sheep. Unless the sheep is a pet -- and has no flight zone -- it is not usually possible to catch it in an open pasture or large pen. The sheep will need to be crowded into a small "catch" pen, the smaller the better. If you have to chase sheep in the pen, it is too large.
The easiest way to catch a sheep is to cup your hand around the bony part of its jaw. Put your other hand on its neck. Keep its head up to control it. If a sheep gets its head down, it is difficult to control. If the sheep is further away, you can grab it by its hind leg, just above the hock. For larger sheep, it is better to grab the rear flank, as close to the body as possible. When catching sheep this way, you need to work your hand up to the head as quickly as possible to gain control of the sheep.
A shepherd's crook will give you a longer reach. There are two types of crooks that can be used to catch sheep: the traditional neck crook and a leg crook. The neck crook is used to catch the sheep by the neck. After you loop the neck, you need to turn your wrist to keep the sheep from getting away. The leg crook is ideal for pasture situations. You can use it to snag a front or hind leg, depending on which way the sheep is facing. Once caught, you need to work your hand up the crook to secure the sheep. Some crooks have dual ends, so you can catch sheep by their neck or feet. You can also use the crook to block sheep and steer them in the direction you want.
You should never catch a sheep by the wool or skin, as this can bruise the muscle and damage the carcass.
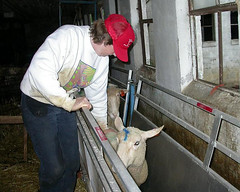
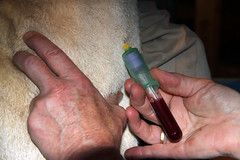
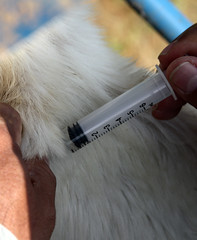
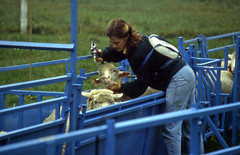
Collecting blood
There are numerous reasons to collect blood from a sheep, including genetic (DNA) testing, disease control/eradication, and pregnancy diagnosis. You will save money if you can learn to collect blood yourself. It is a skill that any shepherd can master with a little practice and patience. Most of what you need can be acquired from a veterinarian, animal health lab, or livestock supply company: needles, syringes, blood tubes (vacutainers), and/or blood cards.
It is usually necessary to shear the neck of a wooled sheep in order to collect a blood sample. It may or may not be necessary to shear the neck of a hair sheep. However, shearing will make it easier to see the vein and will keep the injection site cleaner. Proper restraint is essential. Blood sampling can be done by one person, simply by straddling the sheep. For beginners, it is helpful to have someone restrain the sheep and position the neck.
The animal's head should be held at a thirty-degree angle, opposite to the side where blood will be drawn. The easiest way to locate the vein is to draw an imaginary line from the middle of the animal's eye down the side of its neck. The vein can be located by applying pressure below the halfway point -- the vein should "pop" out.
Blood can be drawn using a needle and syringe or vacutainer. Use a 20 gauge by one-inch needle or less. Use gauze to clean the area with alcohol. After inserting the needle into the vein, pull back on the syringe to see if the needle is in the vein. If no blood pulls back into the syringe, the needle is either parallel to the vein or has gone completely through the vein. Slight movements can be used to try to locate the vein.
When blood is pulled back into the syringe, the needle is in the vein. Fill the syringe with the desired amount of blood. After you are finished, remove pressure from the vein, pull the needle out, and press gently on the injection sire.
Drenching
Drenching is when small amounts of liquid (less than 30 ml) are administered by mouth. It is the preferred method of administering deworming medicine to sheep. Many other medications and supportive therapies can also be delivered via drenching.Sheep are easier to drench if they are in a raceway (chute) or crowded into a small pen. They can be drenched while their head is locked in a head gate. You can also straddle them. The sheep's head should always be kept level, with the jaw parallel to the ground. Tipping the sheep's head may cause the drench to enter its lungs. It is important to use proper equipment when drenching, either a single dose oral syringe with a long metal nozzle or an automatic drench gun with the same type of metal nozzle.
Place your hand under the sheep's chin and move its head slightly to the side. Put the nozzle in the gap between the molar and incisor teeth. Get the nozzle over the back of the animal's tongue. If the dewormer is just put in the mouth, it may by-pass the rumen and be less effective. Push the plunger of the gun or syringe. Give the sheep time to swallow. Ensure that it swallows before you release it. Always be gentle to avoid injuries.
It is important that proper doses of deworming medicine to given to sheep. Underdosing is one of the contributing factors to drug resistance. Use accurate weights to calibrate doses. Calibrate the equipment for each sheep or for the heaviest animals in the group. Separate into groups if necessary based on weight. Check equipment to make sure the proper dose is being delivered. Be sure to clean your equipment after you are done.
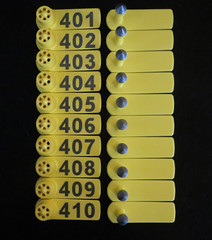
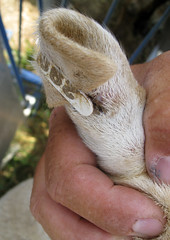
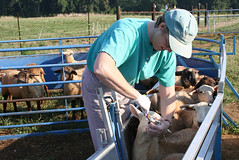
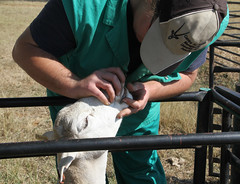
Ear tagging
Ear tagging is the most common method of identifying sheep. Different tags usually require different applicators. Proper technique will maximize tag retention and minimize ear infections. Before inserting a tag, you need to make sure the applicator is working properly. Insert the tag in the applicator. Slowly squeeze the handles together to make sure the male pin is aligned with the female opening.
When tagging, the animal's head needs to be secured to prevent jerking and possible tearing of the ear. You can straddle the sheep, someone else can hold it, or you can secure the sheep's head in a head gate. Place the ear between the jaws of the applicator. While gripping the ear, quickly and firmly squeeze the handles together until the male tag is inserted through the ear into the female tag.
Tag placement is important. Tags should be inserted halfway between the skull and the tip of the ear. Putting tags too close to the tip of the ear will result in more lost tags, as the tip of the ear is tender and tears easily. Tags placed too close to the skull are more likely to get infected, as the tissue is thicker and there is less air access to the tag.
Tags should be inserted in the center of the ear between the veins, avoiding the ridges of cartilage. Two-piece tags should be inserted so that they hang down from the lower ear. One-piece tags should be inserted at the top of the ear. They need to allow for ear growth. If looping tags are too tight, they will tear into the ear as the animal grows. If they are too loose, they may catch on things and tear the ear.
Tag infections are not uncommon, especially in humid climates. You can minimize infections by tagging lambs instead of sheep, by not inserting tags during fly season (late spring-summer), and by not placing tags too close to the skull. Ears should be clean and dry; tags should be clean. The applicator should be dipped in a disinfectant solution, preferably between sheep.
The most serious infections occur when the ear is wet and dirty. Small tags cause less tissue irritation and allow more air access to the wound. Metal and round (button) ear tags allow less air access and should be avoided, as they are more likely to result in infections. It may help to apply an antibiotic, fly repellent, or disinfectant to the ear tissue or tag. Unused tags should be stored in a clean container.
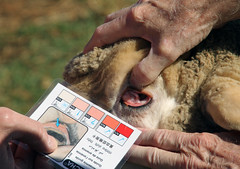
FAMACHA© scoring
FAMACHA© scoring is a relatively new skill that is important for shepherds to master, especially if they are raising sheep in areas where the barber pole worm (Haemonchus contortus) is endemic. FAMACHA© scoring is when you evaluate the color of the conjunctiva of the sheep's lower eye lid to determine its level of anemia and the need for deworming. Anemia (blood loss) is the primary symptom of barber pole worm infection. FAMACHA© is not a decision-making tool for non-blood-feeding parasites.
The "mantra" of FAMACHA© scoring is COVER-PUSH-PULL-POP. COVER the animal's eye with your thumb, then slightly PUSH down on the eyeball, applying enough pressure so that the eye lashes curl up over your thumb. After you PULL down the lower eyelid, the mucous membranes will POP into view. Care must be taken not to shade the eye. FAMACHA© scoring should be done under natural lighting.
FAMACHA© scores and treatment recommendations
FAMACHA© scoring should be done quickly. It is best that you stick with your first impression. If you score the other eye higher, err on the side of caution and go with the higher score. There are no half scores. Animals with FAMACHA© scores of 1 or 2 do not require deworming, unless they show other signs of parasitism. You should always deworm animals with scores of 4 or 5. The challenge is what do with the animals that have FAMACHA© scores of 3.
On the card, there is a question mark (?) next to category 3. You should consider deworming these animals if more than 10% of the flock has FAMACHA© scores of 4 or 5. Animals in poor body condition should be dewormed. If a sheep has "bottle jaw" (a soft swelling of liquid under the jaw), it should be dewormed. Fecal soiling (excessive) is another reason for deworming. It is usually recommended that lambs and pregnant or lactating ewes with FAMACHA© scores of 3 be dewormed.
Frequency of FAMACHA© scoring depends upon environmental conditions (risk). FAMACHA© scoring should be done more frequently when the barber pole worm is most active (summer in temperate climates). Every two weeks is recommended. More frequent checking may be required in warmer, more humid climates. During spring and fall when temperatures are cooler, less frequent checking may be required, e.g. every 3 to 4 weeks. During the winter, the barber pole worm may not be active, depending upon climate. In tropical and sub-tropical climates, the need for FAMACHA© scoring is greater. It may be year-round and more frequent.
Unless you are a veterinarian, you need to take an approved training in order to get a FAMACHA© card. The University of Georgia is the sole distributor of FAMACHA© cards in the US. An in-person training is recommended, but there are online options for FAMACHA© certification. Because FAMACHA© scores are based on color, you should not attempt to make your own FAMACHA© card using a color printer or use your smart phone for scoring. In fact, it may be necessary to replace FAMACHA© cards every 2 to 3 years, due to color fading. When not in use, FAMACHA© cards should be stored in a dark place.
Giving injections
There are many reasons to give sheep injections and different ways to give injections. Most vaccines and other preparations are given subcutaneously (SQ) which means "under the skin." SQ injections are the easiest to give and should be given whenever possible.
SQ
A subcutaneous injection is given in areas where the skin is loose. Behind the elbow -- the axilla or armpit -- is one of the most common places to give the injection. On the side of the neck or behind the shoulder is another location. Large volume subcutaneous injections, such as those used for treating pregnancy toxemia or milk fever, should be given over the ribs.To give a subcutaneous injection, you pull a handful of skin to make a "tent" and slide the needle into the base of the tent. Care must be taken to make sure you don't poke the needle out the other end of the tent. The plunger should be pulled out to make sure you are not in a blood vessel. If pressure is felt during the injection, do not keep pushing the plunger; you may be in the muscle. Some injections (e.g. LA-200) sting. It helps to massage the area after injection.
IM
Some drugs have to be injected deep into the muscle to give more rapid absorption. The preferred site of an intramuscular (IM) injection is the muscle mass of the neck. The hind leg should be avoided as an injection site, as it is high-priced cut of meat and the last place you want an abscess to form.When giving an IM injection, insert the needle quickly, straight into the muscle, but do not force it. Resistance could indicate that you have struck a bone. As with the subcutaneous injection, you should draw back the syringe to make sure you are not in a blood vessel. The solution should be injected slowly. IM injections can also be painful, so massage the area after you remove the needle. Massaging will also help deliver the solution into the tissues.
IV
Lifesaving treatments often require intravenous (IV) injections, as they are the fastest route to administer a drug. An intravenous injection is given in the vein, usually the jugular. Finding the vein can be tricky. Only experienced individuals or veterinarians should attempt IV injections. It is important that all intravenous injections be given very slowly, as rapid injections of a medication into a vein can be lethal.IP
Some hypothermic or weak lambs may require an intraperitoneal (or intra-abdominal) injection of glucose or dextrose. To give this live-saving injection, the lamb should be held by its forelegs with its hind legs hanging down. The lamb can also rest on its backside between your legs or be placed on its side. The needle should be injected one inch below the navel, one half inch to either side. It should be pointed towards the tail head. Make sure the solution goes into the abdomen and not under the skin. The solution should be injected slowly.Intramammary
In sheep, antibiotics for mastitis are sometimes injected directly into the udder, via the teat canal. Intramammary injections are actually infusions that use a long neck of a tube as opposed to a needle. The teat is a very delicate structure, so care must be taken when inserting the tube into the teat.It goes without saying that clean needles should be used for injections. Vaccination needles should be changed frequently. A clean needle should always be used to draw solution out of a medication bottle. Used needles should be put in a suitable sharps container and disposed of according to local government regulations.
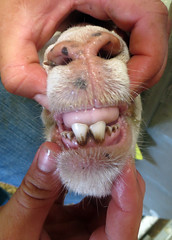
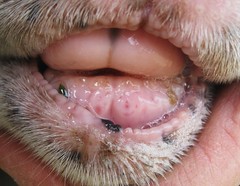
Mouthing
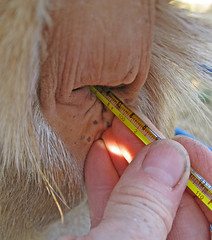
There are two reasons to mouth a sheep: estimate its age and determine the health and soundness of its mouth and teeth. Sheep have no top front teeth. They have a hard dental pad that their bottom incisors bite against. The dental pad and incisor teeth should line up. If the upper jaw is longer than the lower jaw, this is called an overbite or "parrot" mouth. When the lower jaw is longer than the upper jaw, it is called an underbite or "monkey" mouth. Jaw defects are inherited. Rams with jaw defects should no be used for breeding. Ewes with jaw defects should no be registered.
You can estimate age according to when the temporary milk teeth have been replaced by permanent incisors. Lambs start with eight temporary incisor (milk) teeth. The center pair of permanent teeth start to erupt around 12 months of age, though this will vary. The second pair will be present when the sheep is about 24 months of age. At 36 months of age, there will be three pairs of permanent teeth. A sheep will have a complete set (full mouth) of permanent incisors (4 pairs) when it is about 4 years of age.
As the sheep ages, the incisor teeth will wear, spread, and break off. Sheep with worn or lost teeth are called "broken mouth." They should be culled, unless they can be given special attention. A sheep with no permanent incisors is called a "gummer." It can still manage to eat if there is plenty of pasture available, but it will have a difficult time grazing short pasture. Teeth problems (age) are the primary reason sheep are culled.
Sheep don't like you checking their teeth. Start by restraining the sheep in a race, straddling it, or tipping it on its rump. With the sheep's mouth closed and held in the normal resting position, you can determine the alignment of its teeth by running an index finger along the dental pad. To determine age, you will need to part the lips. While holding the sheep's head, place one hand around the muzzle and use your other hand to part its lips. For bigger sheep, you may need both hands.
The big teeth in the back are molars. Sheep have 24 molars. Molar problems can be an unrecognized cause of weight loss. You can check the molars by feeling the jaws for abnormal thickening. You can feel through the cheeks for displaced or missing molar teeth. Swollen cheeks, drooling of saliva, and feed sticking out of the cheeks may be signs that there are problems with the molars.
Replacing a prolapse
A vaginal prolapse is when a ewe pushes her vagina out of her vulva. It usually happens in the month preceeding lambing. A prolapsed vagina appears as a smooth, red mass that varies in size from a tennis ball to a melon.
Vaginal prolapses need to be replaced quickly to prevent more serious problems. To do so, the ewe needs to be properly restrained. The prolapse should be washed with warm water and a mild antiseptic. Contamination, such as manure or straw, should be removed from it. The prolapse should be handled carefully. Before being replaced, it should be covered with lubricant. You should apply gentle pressure to push the prolapse back into the ewe. You can use the flat of your hand or your fist to push it in. The ewe may continue to strain during replacement. Wait until she stops straining to replace it.
Once you have successfully replaced the prolapse, you need to keep it from coming back out. There are several options. You can use a commercial prolapse harness to keep the prolapse in. The harness applies pressure around the vulva to keep the vagina from coming back out. You need to fit the harness properly and make sure it does not cause any sores. You may be able to loosen it after awhile. A ewe can lamb past a harness, but it is best to remove it. Some people prefer to make their own harness using baling twine or rope.
Another option is a bearing retainer or ewe spoon. It is a plastic device that is inserted into the vulva. It is important to clean and disinfect the spoon before inserting it. The ends of the spoon are usually tied to a clump of wool. If there is not wool or the wool is not long enough, it can be tied to the buckles of a prolapse harness. Some people use both a retainer and a harness to keep prolapses in. A ewe can lamb past a prolapse retainer, but ideally it should be removed.
The third option is suturing, which may be required in more advanced cases. The lips of the vulva are sutured to prevent the vagina from coming out. The sutures are pulled tight so that only two fingers can pass through the opening. The stitches must be removed before lambing. Suturing should be done by a veterinarian, as the ewe should receive an epidural block before the procedure is performed.
It may be necessary to give antibiotics to ewes that have prolapsed to prevent or treat bacterial infections. Pain killers may be prescribed by your veterinarian.
Tipping
Tipping is when you put a sheep on its rump. In this position, sheep struggle less and are generally easier to work with. To tip a sheep, hold the sheep in a standing position. For a right-handed person, place your left hand under its chin. With your left knee positioned behind the sheep's shoulder and your right leg touching the sheep's left side near its left hip, turn the sheep's nose away from you.
You should feel the weight of the sheep lean against your legs. Put pressure on the hips so the sheep cannot pick its feet off the ground. Take a step back with your right leg. The hind end of the sheep should to go down. Continue to bring the head around until the sheep is sitting down with its back leaning against your legs. For heavier sheep, you can bend over the sheep and from underneath grab the two farthest legs to bring the sheep down.
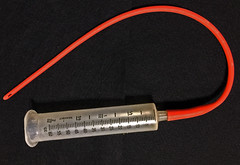
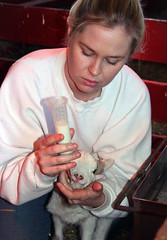
Tube feeding
Being able to feed young lambs with an esophageal feeding tube is an important skill for shepherds to master. Without tubing, many lambs will die or fail to thrive. Not only is tube feeding quicker than bottle feeding, but tube-fed lambs as less likely to become attached to humans and be reluctant to nurse their dams.
There are numerous reasons to tube feed a lamb. Some lambs are too weak to nurse. Sometimes, a ewe will not let a lamb nurse. Sometimes, she does not have any milk for her lambs. It may be necessary to tube feed electrolytes to a lamb with severe diarrhea. You should not tube feed a lamb that cannot lift its head. Instead these lambs should be warmed first (if necessary) and given an intraperitoneal injection of glucose.
To tube feed a lamb, you need a soft, flexible feeding tube and a catheter-tipped syringe. Feeding tubes are usually red rubber or clear plastic. The plastic ones are less flexible and easier to insert, while the red rubber tubes stay more flexible, especially in cold weather. Feeding tubes can vary in length and diameter. Syringes come in different sizes, too. A 60 ml (2 oz.) syringe is most commonly used. A 140-cc syringe will save time and colostrum.
The first thing you should do is place the tube alongside the lamb's body to see how far the tube will need to be inserted to reach the last rib. You cannot pass the tube too far, but you can pass it not far enough. Hold the lamb between your legs to restrain it. Gently insert the tube in the lamb's mouth. Allow it to swallow as you advance the tube. Some lambs will chew on the tube. You should be able to see or feel the tube as it advances. Don't force the tube. The lamb may resist slightly, but it should resist too severely. If the lamb begins to cough, the tube may be in the trachea. If this is the case, remove the tube and start all over again.
Once the tube is fully inserted, attach the syringe (filled with colostrum, milk, or milk replacer). Let the fluid trickle via gravity. Do not force the milk flow. The plunger of the syringe is not usually used unless very thick colostrum is fed. Wait until all the milk has flowed out of the entire length of the tube before removing it. Otherwise, you may accidently allow milk to get into the lamb's lungs. It helps to pinch the end of the tube while removing it. Be sure to disinfect feeding equipment immediately after use.
Basic shepherding skills
<== SHEEP 201 INDEX
Copyright© 2021. Sheep 101 and 201.